

Linux Foundation CKAD Certification Exam Dumps with 239 Practice Test Questions
New CKAD Exam Dumps with High Passing Rate
Linux Foundation Certified Kubernetes Application Developer (CKAD) certification exam is a globally recognized certification program that validates the skills of Kubernetes application developers. The CKAD certification exam is designed to test the proficiency of developers in creating and deploying applications on Kubernetes clusters. It is one of the most sought-after certifications in the world of containerization and cloud-native computing.
Achieving the CKAD certification is a significant milestone for professionals who want to advance their career in the field of Kubernetes application development. Linux Foundation Certified Kubernetes Application Developer Exam certification demonstrates the candidate's proficiency in designing, deploying, and managing applications on Kubernetes and is recognized by leading companies in the tech industry. The CKAD certification provides an opportunity for professionals to showcase their skills and expertise, enhance their credibility, and increase their earning potential.
NEW QUESTION # 23
You have a Deployment named 'my-app' that runs 3 replicas of a Python application. You need to implement a bluetgreen deployment strategy where only a portion of the traffic is directed to the new version of the application initially. After successful validation, you want to gradually shift traffic to the new version until all traffic is directed to it. You'll use a new image tagged for the new version.
Answer:
Explanation:
See the solution below with Step by Step Explanation.
Explanation:
Solution (Step by Step) :
1. Create a new Deployment for the new version:
- Create a new Deployment file called 'my-app-v2.yaml'
- Define the 'replicas' to be the same as the original Deployment.
- Set the 'image' to 'my-app:v2'
- Ensure the 'metadata-name' is different from the original deployment.
- Use the same 'selector.matchLabelS as the original Deployment.
- Create the Deployment using 'kubectl apply -f my-app-v2.yaml'.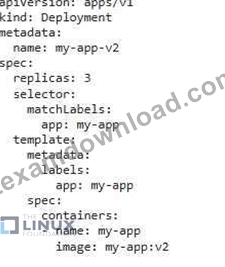
2. Create a Service for tne new Deployment: - Create a new Service file called 'my-app-v2-service.yaml'. - Define the 'selector' to match the labels of the 'my-app-v2 Deployment. - Set the 'type' to 'LoadBalancer' or 'NodePort' (depending on your environment) to expose the service. - Create the Service using 'kubectl apply -f my-app-v2-service.yaml"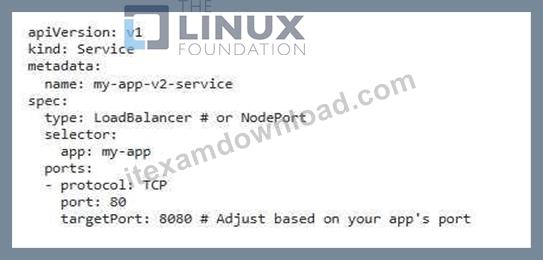
3. Create an Ingress (or Route) for traffic routing: - Create an Ingress (or Route) file called 'my-app-ingress.yaml' - Define the 'host' to match your domain or subdomain. - Use a 'rules' section with two 'http' rules: one for the original Deployment C my-app-service' in this example) and one tor the new Deployment my- app-v2-service' in this example). - Define a 'path' for each rule to define the traffic routing. For example, you could route 'r to 'my-app-service' and ','v2 to 'my-app-v2-services - Create the Ingress (or Route) using 'kubectl apply -f my-app-ingress.yaml'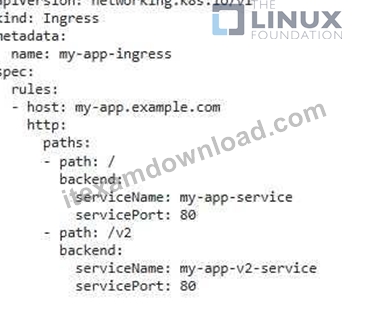
4. Test the new version: - Access the my-app.example.com/v2 endpoint to test the new version of your application. - Validate the functionality of the new version. 5. Gradually shift traffic: - You can adjust the 'path' rules in the Ingress (or Route) to gradually shift traffic to the new version. For example, you could define a 'path' like S/v2/beta' and then later change it to '/v2 - Alternatively, you can use a LoadBalancer controller like Kubernetes Ingress Controller (Nginx or Traefik) to configure traffic splitting using weights or headers. 6. Validate the transition: - Continue monitoring traffic and application health during the gradual shift. - Ensure a smooth transition to the new version without impacting users. 7. Delete the old Deployment and Service: - Once all traffic is shifted to the new version and you are confident in its performance, delete the old Deployment and Service C kubectl delete deployment my-app' and 'kubectl delete service my-app-service') to complete the blue/green deployment process. Note: This is a simplified example. In a real production environment, you would likely need to implement additional steps for: - Health checks: Ensure the new version is healthy before shifting traffic. - Rollback: Implement a rollback mechanism to quickly revert to the previous version if needed. - Configuration management: Store and manage configuration settings consistently across deployments. - Monitoring and logging: Monitor the new version for performance and health issues. ,
NEW QUESTION # 24 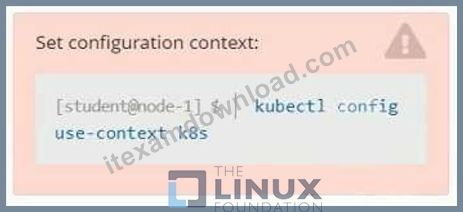
Context
As a Kubernetes application developer you will often find yourself needing to update a running application.
Task
Please complete the following:
* Update the app deployment in the kdpd00202 namespace with a maxSurge of 5% and a maxUnavailable of
2%
* Perform a rolling update of the web1 deployment, changing the Ifccncf/ngmx image version to 1.13
* Roll back the app deployment to the previous version
Answer:
Explanation:
See the solution below.
Explanation
Solution:
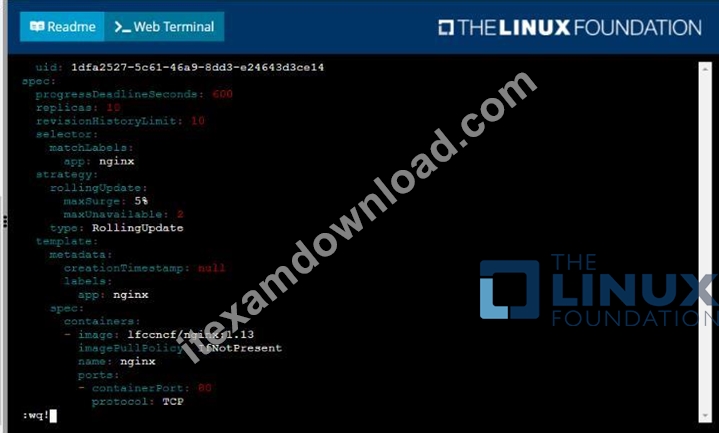
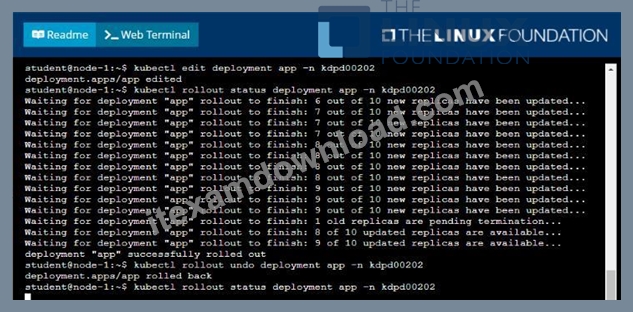
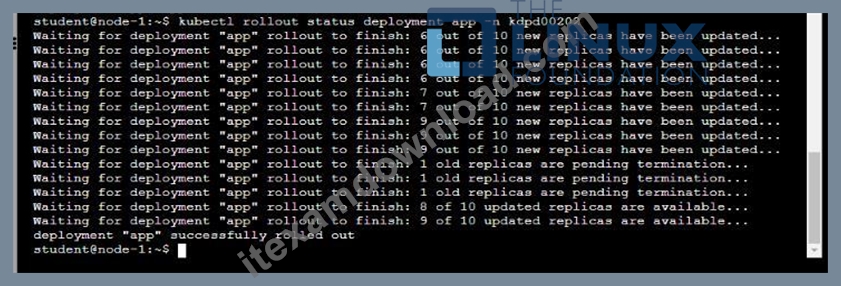
NEW QUESTION # 25
You are developing a microservices application and want to deploy it to Kubernetes using Helm. You have two services: 'user-service and 'order-service. The 'order-service depends on the "user-service'. How would you use Helm to manage these deployments, ensuring that the 'order- service' only starts after the 'user-service' is successfully deployed and running?
Answer:
Explanation:
See the solution below with Step by Step Explanation.
Explanation:
Solution (Step by Step) :
1. Create a Helm Chart for Each Service:
- 'user-service' chart:
- Create a 'values.yamr file for the 'user-service' chart.
- Define the container image, resources, and any other necessary configurations for the 'user-service'.
- 'order-service' chart:
- Create a 'values-yamr file for the 'order-service' chart
- Define the container image, resources, and any other necessary configurations for the 'order-service'
- In tne 'values.yamr, add a dependency on the 'user-service' chart.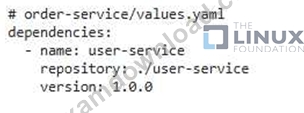
2. Configure Helm for Dependency Management: - Use the '-dependency-update' flag to ensure that Helm automatically updates the 'user-service chart before deploying the 'order-service' bash helm dependency update order-service 3. Deploy the Services Using Helm: - Deploy the 'user-service chart: bash helm install user-service Juser-service - Deploy the 'order-service' chart: bash helm install order-service ./order-service - Helm will automatically handle the dependency between the services, ensuring that the 'user-services is deployed before the 'order-service' 4. Verify Deployment and Dependency: - Use ' kubectl get pods -l app=user-service' and 'kubectl get pods -l app=order-service' to verify that the pods are running. - You Should observe that the 'user-service' pods are up and running before the 'order-services pods start. - You can also use 'kubectl describe pod' to see the pod events and confirm that the 'order-service' pod is waiting for the 'user-service' to be ready before starting.,
NEW QUESTION # 26
Context
Anytime a team needs to run a container on Kubernetes they will need to define a pod within which to run the container.
Task
Please complete the following:
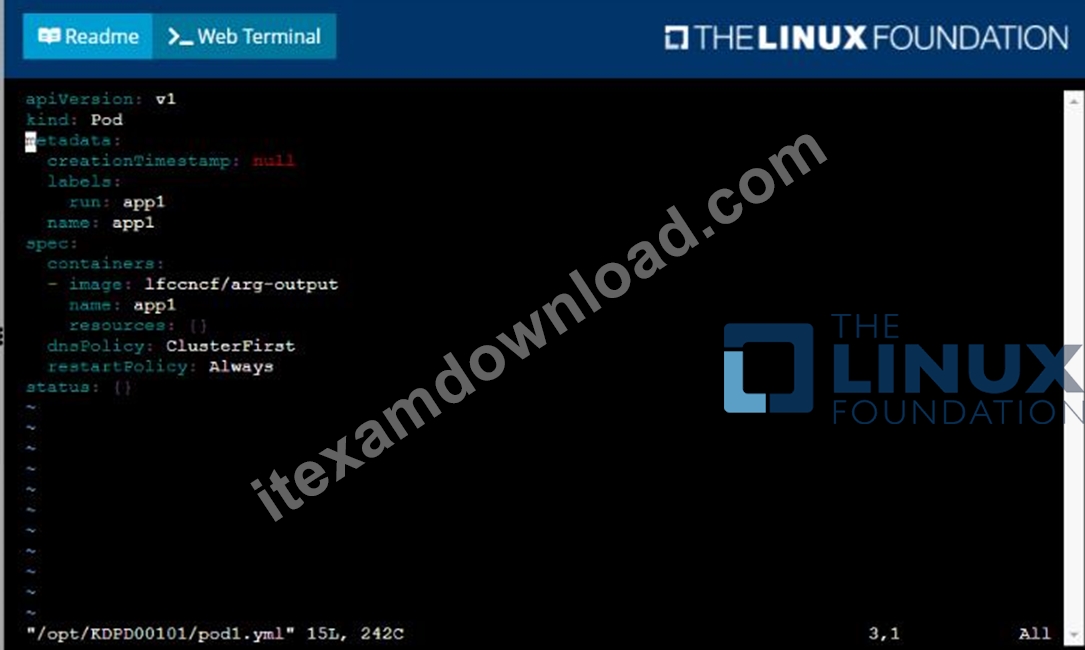
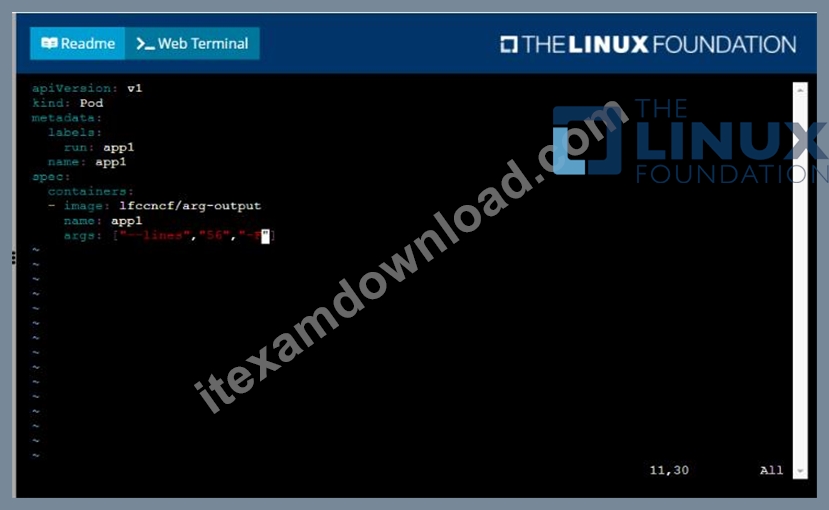
* Create a YAML formatted pod manifest
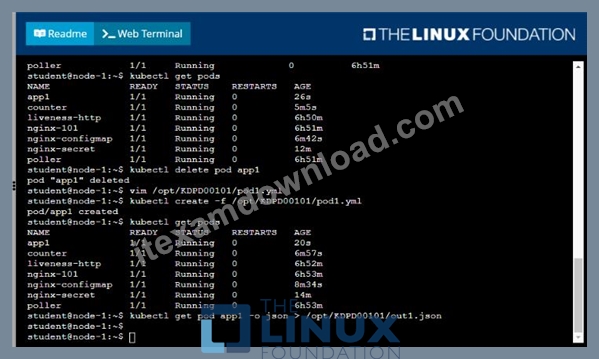
/opt/KDPD00101/podl.yml to create a pod named app1 that runs a container named app1cont using image Ifccncf/arg-output with these command line arguments: -lines 56 -F
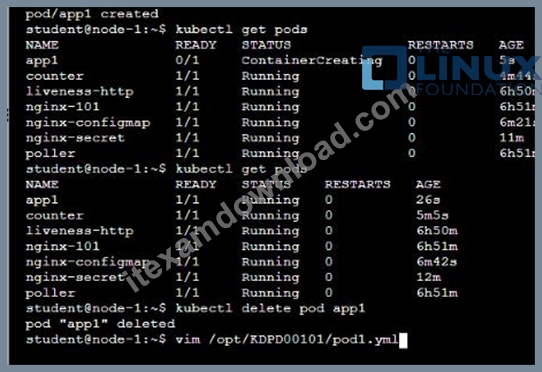
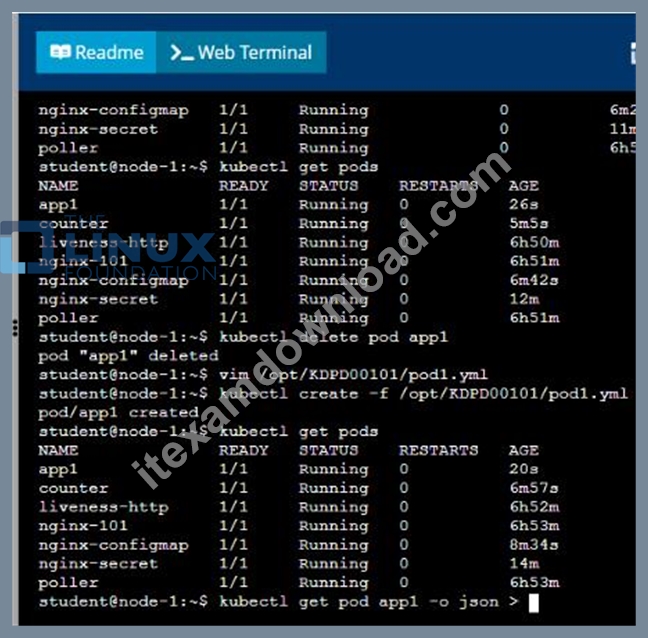
* Create the pod with the kubect1 command using the YAML file created in the previous step
* When the pod is running display summary data about the pod in JSON format using the kubect1 command and redirect the output to a file named /opt/KDPD00101/out1.json
* All of the files you need to work with have been created, empty, for your convenience
Answer:
Explanation:
Solution:
NEW QUESTION # 27
You are managing a Kubernetes cluster running a highly-available application that uses a custom resource called 'Orders. The 'orders resource is created and managed by a custom controller that ensures the order processing workflow runs flawlessly. However, the 'order' resource's validation rules have changed, requiring a new schema to be applied. How can you ensure that the existing 'Order' resources conform to the new schema without disrupting the application's functionality?
Answer:
Explanation:
See the solution below with Step by Step Explanation.
Explanation:
Solution (Step by Step) :
I). Define the New Schema:
- Create a new CustomResourceDefinition (CRD) file with the updated schema for the 'Order' resource.
- Ensure that the CRD's 'spec-validation.openAPlV3Schema' field includes all the new validation rules.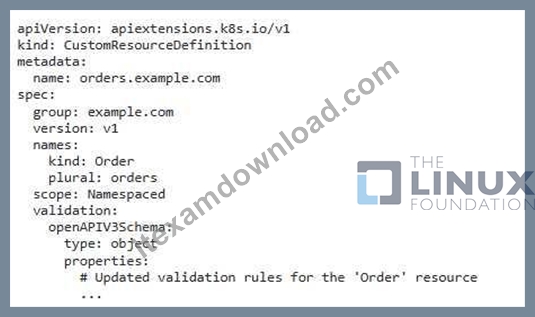
2. Update the CRD: - Apply the new CRD definition using 'kubectl apply -f order-crd.yaml'. 3. Create a Webhook for Validation: - Define a webhook in your Kubernetes cluster that will be responsible for validating the 'order' resources against the new schema. - Configure the webhook to be invoked during resource creation and update operations.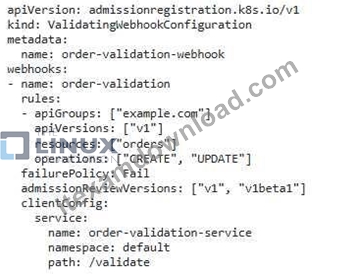
4. Deploy the Validation Service: - Create a deployment for the validation service that implements the logic for validating the 'Order' resources against the new schema. - The service should expose an endpoint that the webhook can communicate with.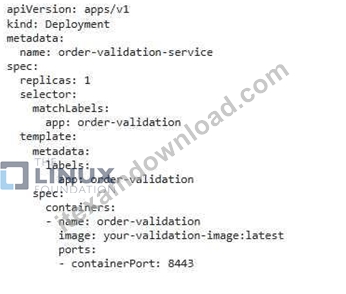
5. Reconcile Existing Resources: - Once the validation webhook and service are deployed, create a temporary job that iterates through all existing 'Order resources. - The job snould validate each resource against tne new schema and automatically update any resources that do not comply.
By following these steps, you can ensure that your 'order' resources conform to the new schema without disrupting the application's functionality The validation webhook prevents new invalid resources from being created, and the reconciliation job ensures that existing resources are updated to meet the new schema requirements. This approach allows for smooth schema evolution and maintains the consistency of your data.,
NEW QUESTION # 28
You have a Kubernetes application that uses a Deployment named sweb-app' to deploy multiple replicas of a web server pod. This web server application needs to be accessible through a public IP address. You are tasked with implementing a service that allows users to access the application from outside the cluster. However, the service should exposed via a specific port number (8080), regardless ot the port that the web server listens on inside the pods.
Answer:
Explanation:
See the solution below with Step by Step Explanation.
Explanation:
Solution (Step by Step) :
1. Create the Service YAMI-:
- Define the service type as 'LoadBalancer' to expose it via a public IP
- Set the 'targetPort' to the port that the web server listens on inside the pods (let's assume it's 8080)-
- Set the 'port' to 8080, which will be the port used to access the service from outside the cluster.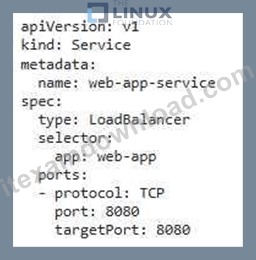
2. Apply the Service: - Use 'kubectl apply -f web-app-service.yaml' to create the service- 3. Get the External IP: - Once the service iS created, use 'kubectl get services web-app-services to get the external IP address. This will be assigned by the cloud provider and will be available for users to access the application. 4. Test the Service: - Access the application using the external IP address and port 8080. For example, if the external IP is '123.45.67.89' , you would access the application through 'http://123.45.67.89:8080' ,
NEW QUESTION # 29
Context
Task:
A pod within the Deployment named buffale-deployment and in namespace gorilla is logging errors.
1) Look at the logs identify errors messages.
Find errors, including User "system:serviceaccount:gorilla:default" cannot list resource "deployment" [...] in the namespace "gorilla"
2) Update the Deployment buffalo-deployment to resolve the errors in the logs of the Pod.
The buffalo-deployment 'S manifest can be found at -/prompt/escargot/buffalo-deployment.yaml
Answer:
Explanation:
Solution: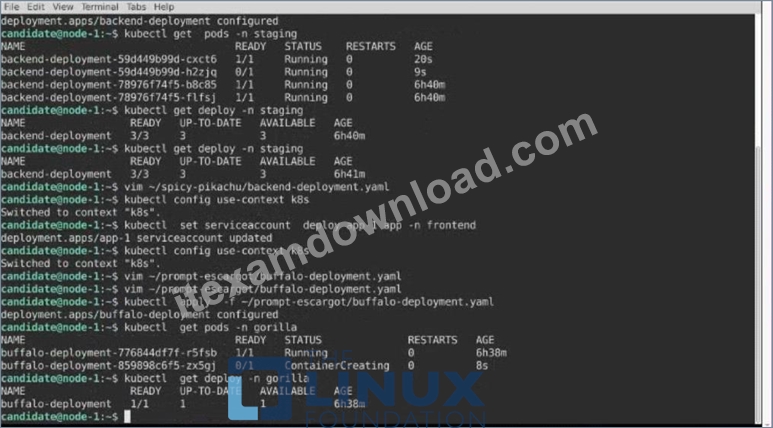
NEW QUESTION # 30
You have a Deployment named 'my-app-deployment' that runs 3 replicas of a Spring Boot application. This application needs to access a PostgreSQL database hosted on your Kubernetes cluster. You need to create a Custom Resource Definition (CRD) to define a new resource called 'Database' to represent the PostgreSQL database instances within your cluster. This CRD should include fields for specifying the database name, username, password, and the host where the database is deployed. Further, you need to configure the 'my- app-deployment' to use the 'Database' resource to connect to the PostgreSQL instance dynamically.
Answer:
Explanation:
See the solution below with Step by Step Explanation.
Explanation:
Solution (Step by Step) :
1. Define the CRD:
- Create a YAML file named 'database.crd.yaml' to define the "Database' resource: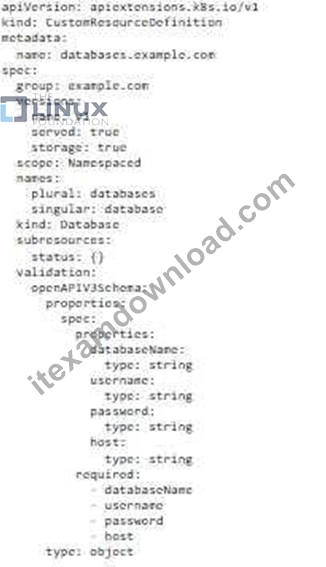
2. the CRD: - Apply tre 'database.cre.yaml' using 'kubectl "ply -f database.crd.ya'mr 3. Create A Database Instance: - 'eate YAML file 'd:tabaseyarnl' to define a database instance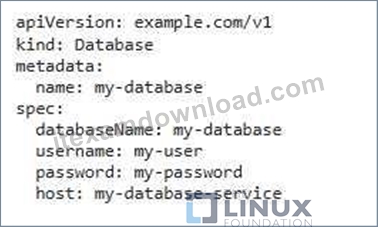
4. Apply the Database Instance: - Apply the 'database.yaml' using 'kubectl apply -f database.yamr 5. IJpdate the Deployment - Update the Amy-app-deployment.yaml' to use the 'Database' resource: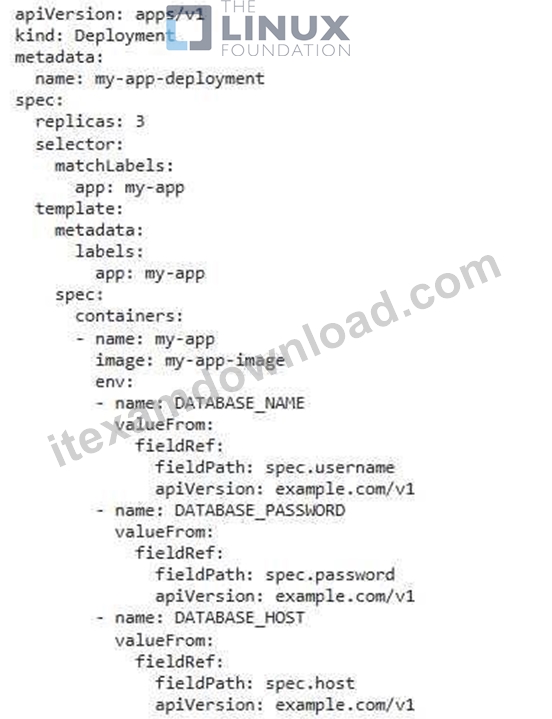
6. Apply the Updated Deployment: - Apply the updated 'my-app-deployment.yamr using 'kubectl apply -f my-app-deployment.yamr 7. Verify the Configuration: - Use 'kubectl get databases to check the database instance. - Use 'kubectl describe pod -l app=my-app' to verify that the pods are using the values from the 'Database' resource tor connecting to the PostgreSQL database. This approach demonstrates how to utilize CRDs to define custom resources in Kubernetes and how to connect applications dynamically to these resources. The CRO ensures proper definition of the database resource, while the deployment utilizes the 'fieldRef mechanism to access and retrieve database connection details directly from the CRD, enabling dynamic configuration and simplification of application setup.,
NEW QUESTION # 31
You have a Kubernetes cluster running a critical application. To enhance security, you need to implement a NetworkPolicy that restricts ingress traffic to your application pods only from specific allowed IP addresses and ports. Furthermore, you want to allow egress traffic to all external services.
Answer:
Explanation:
See the solution below with Step by Step Explanation.
Explanation:
Solution (Step by Step) :
1. Define Allowed IP Addresses and Pons:
- Identify tne specific IP addresses and ports from whiCh you want to allow ingress traffic. For example, let'S say you want to allow traffic from
192.168.1.10 on port 8080.
2. Create the NetworkPolicy YAML:
- Create a NetworkPolicy YAML file named 'ingress-restriction.yamr with the following contents: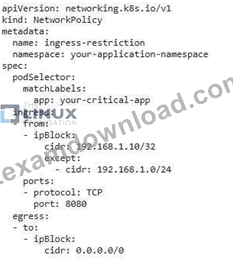
3. Apply the NetworkPolicy: - Apply the NetworkPoliCY YAML file using kubectl apply -f ingress-restriction.yamr 4. Test the NetworkPolicy: - Try to access the pods running your critical application from other IP addresses or ports outside of the allowed ones. This should result in connection Failures. - Attempt to access external services from the pods. This should succeed as egress traffic is allowed.
NEW QUESTION # 32
You are deploying a new application named 'streaming-services that requires 7 replicas. You want to implement a rolling update strategy that allows for a maximum of two pods to be unavailable at any given time. However, you need to ensure that the update process is triggered automatically whenever a new image is pusned to the Docker Hub repository 'streaming/streaming-service:latest'.
Answer:
Explanation:
See the solution below with Step by Step Explanation.
Explanation:
Solution (Step by Step) :
I). Update the Deployment YAMI-:
- Update the 'replicas' to 7.
- Define 'maxunavailable: 2" and 'maxSurge: (Y in the 'strategy.rollingUpdate' section.
- Configure a 'strategy.types to 'Rollingl_lpdates to trigger a rolling update when the deployment is updated.
- Add a 'spec-template.spec.imagePullPolicy: Always' to ensure that the new image is pulled even if it exists in the pod's local cache.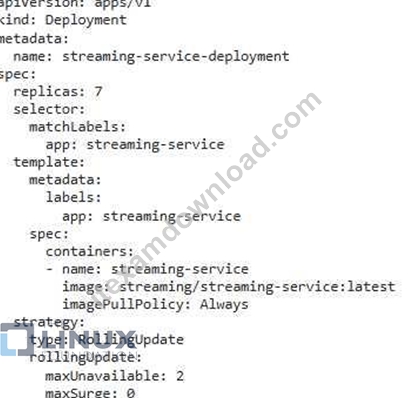
2. Create the Deployment: - Apply the updated YAML file using 'kubectl apply -f streaming-service-deployment-yamr 3. Verify the Deployment - Check the status of the deployment using 'kubectl get deployments streaming-service-deployment to confirm the rollout and updated replica count. 4. Trigger the Automatic Update: - Push a new image to the 'streaming/streaming-service:latest' Docker Hub repository. 5. Monitor the Deployment - Use 'kubectl get pods -l app=streaming-service' to monitor the pod updates during the rolling update process. You will observe that two pods are terminated at a time, while two new with the updated image are created. 6. Check for Successful Update: - Once the deployment is complete, use 'kubectl describe deployment streaming-service-deployment' to see that the 'updatedReplicas' field matches the 'replicas' field, indicating a successful update.
NEW QUESTION # 33 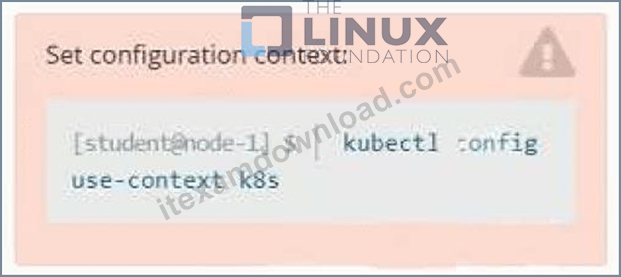
Set Configuration Context:
[student@node-1] $ | kubectl
Config use-context k8s
Context
A pod is running on the cluster but it is not responding.
Task
The desired behavior is to have Kubemetes restart the pod when an endpoint returns an HTTP 500 on the
/healthz endpoint. The service, probe-pod, should never send traffic to the pod while it is failing. Please complete the following:
* The application has an endpoint, /started, that will indicate if it can accept traffic by returning an HTTP 200.
If the endpoint returns an HTTP 500, the application has not yet finished initialization.
* The application has another endpoint /healthz that will indicate if the application is still working as expected by returning an HTTP 200. If the endpoint returns an HTTP 500 the application is no longer responsive.
* Configure the probe-pod pod provided to use these endpoints
* The probes should use port 8080
Answer:
Explanation:
See the solution below.
Explanation:
Solution:
To have Kubernetes automatically restart a pod when an endpoint returns an HTTP 500 on the /healthz endpoint, you will need to configure liveness and readiness probes on the pod.
First, you will need to create a livenessProbe and a readinessProbe in the pod's definition yaml file. The livenessProbe will check the /healthz endpoint, and if it returns an HTTP 500, the pod will be restarted. The readinessProbe will check the /started endpoint, and if it returns an HTTP 500, the pod will not receive traffic.
Here's an example of how you can configure the liveness and readiness probes in the pod definition yaml file:
apiVersion: v1
kind: Pod
metadata:
name: probe-pod
spec:
containers:
- name: probe-pod
image: <image-name>
ports:
- containerPort: 8080
livenessProbe:
httpGet:
path: /healthz
port: 8080
initialDelaySeconds: 15
periodSeconds: 10
failureThreshold: 3
readinessProbe:
httpGet:
path: /started
port: 8080
initialDelaySeconds: 15
periodSeconds: 10
failureThreshold: 3
The httpGet specifies the endpoint to check and the port to use. The initialDelaySeconds is the amount of time the pod will wait before starting the probe. periodSeconds is the amount of time between each probe check, and the failureThreshold is the number of failed probes before the pod is considered unresponsive.
You can use kubectl to create the pod by running the following command:
kubectl apply -f <filename>.yaml
Once the pod is created, Kubernetes will start monitoring it using the configured liveness and readiness probes. If the /healthz endpoint returns an HTTP 500, the pod will be restarted. If the /started endpoint returns an HTTP 500, the pod will not receive traffic.
Please note that if the failure threshold is set to 3, it means that if the probe fails 3 times consecutively it will be considered as a failure.
The above configuration assumes that the application is running on port 8080 and the endpoints are available on the same port.
NEW QUESTION # 34
You have a Kubernetes cluster running a microservices application. The application nas a set of microservices deployed as Deployments, each with their own set of resource requests and limits- You want to implement a monitoring system to track the resource utilization of these microservices.
Answer:
Explanation:
See the solution below with Step by Step Explanation.
Explanation:
Solution (Step by Step) :
1. Install Prometheus: Prometheus is an open-source monitoring system that collects and stores metrics. You can install Prometheus in your Kubernetes cluster using a Deployment: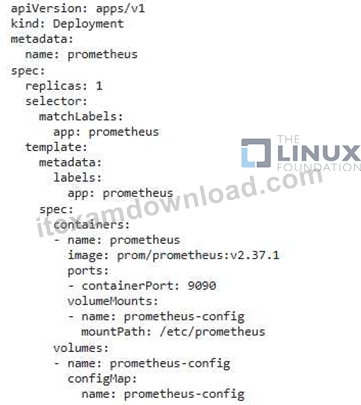
2 Create a ConfigMap for Prometheus: Define a ConfigMap to configure Prometheus with the desired scrape targets and other settings: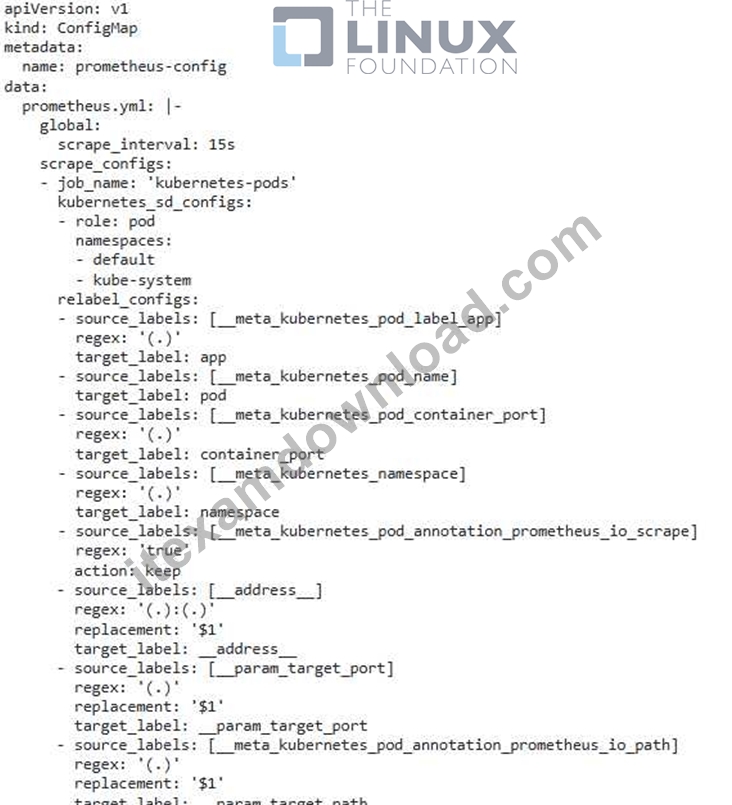
3. Create a Service for Prometheus: Create a Service to expose Prometheus outside the cluster: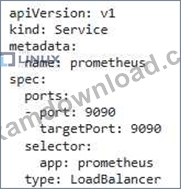
4. Install Grafana: Grafana is a popular open-source dashboard and visualization tool. You can install Grafana in your Kubernetes cluster using a Deployment: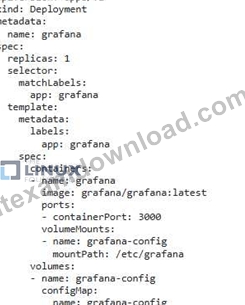
5. Create a ConfigMap for Grafana: Create a ConfigMap to configure Grafana with Prometheus as the data source: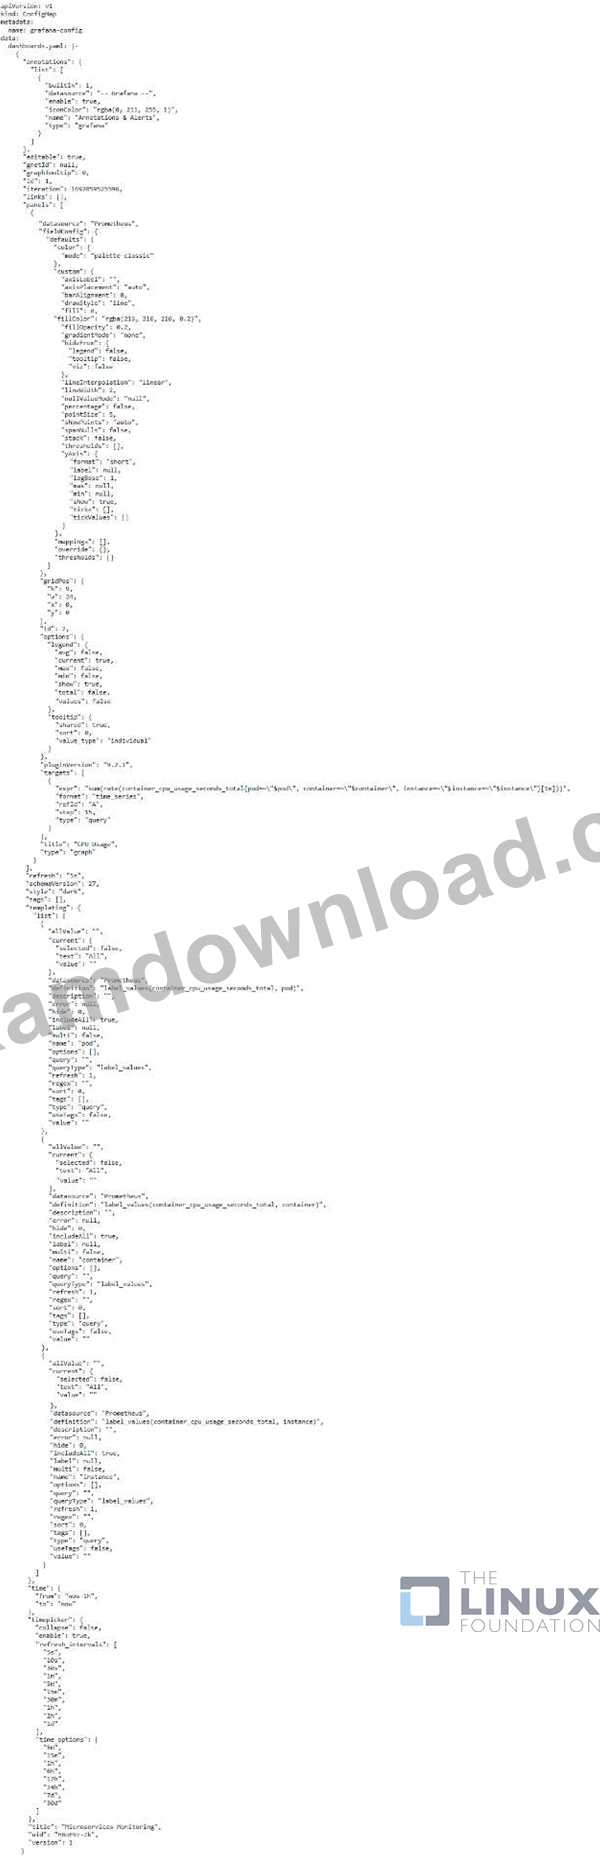
6. Create a Service for Grafana: Create a Service to expose Grafana outside the cluster: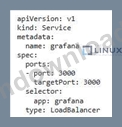
T Configure Gratana: Access the Grafana web interface (using the LoadBalancer IP address) and configure a new data source for Prometheus. Specify the Prometheus Service address. 8. Create Dashboards: Create dashboards in Gratana to visualize the metrics collected by Prometheus. You can create dashboards for individual microservices, showing metrics like CPU usage, memory usage, network traffic, and response times. 9. Monitor Your Microservices: Once you have dashboards set up, you can monitor your microservices' resource utilization and performance in real time. use Grafana's alerting features to be notified of any issues or potential problems. ,
NEW QUESTION # 35
You have a Deployment for a stateless application that involves several containers. You want to expose this application as a single service using a Service resource- You also want to configure the Service to use a specific label selector to target the correct pods and to ensure that the Service uses a round-robin load balancing strategy for distributing traffic across the pods. Explain how you can create the Service resource and configure it to acnjeve this.
Answer:
Explanation:
See the solution below with Step by Step Explanation.
Explanation:
Solution (Step by Step) :
1. Create a Service:
- Create a Service resource that defines how the pods of your application will be accessed externallv
- Specify a unique name for the Service and define the port mapping-
- Example: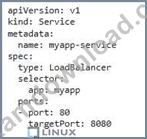
2. Set Selector: - Use the 'selector field to specify the label that the Service should use to identify the pods it should target - Ensure that the pods of your Deployment are labeled with the specified 'app: myapp' label. 3. Configure Load Balancing: - The default load balancing strategy for Kubernetes Services is round-robin, which distributes traffic evenly across the available pods. - No additional configuration is needed for this strategyc 4. Deploy and Test: - Apply the Service YAML file. - Test the Service by accessing it from outside the cluster. - Ensure that the traffic is distributed evenly across the pods using the round-robin strategy. 5. Optional: External Access: - If you want to expose the Service to the internet, you can set the Service 'type' to 'Load8alancer'. This will create a LoadBalancer resource (often an external IP address) that routes traffic to the Service.
NEW QUESTION # 36
You have a Kubernetes cluster with a Deployment named 'my-app' running a simple web application. The 'my-app' Deployment is configured to use a ServiceAccount named 'my-app-sa' _ You want to ensure that only authorized users with specific permissions can access the 'my-app' pod's logs. How would you implement this using Role-Based Access Control (RBAC)?
Answer:
Explanation:
See the solution below with Step by Step Explanation.
Explanation:
Solution (Step by Step) :
I). Create a Role:
- Define a new Role named 'my-app-log-reader' that grants access to read logs of the 'my-app' pod.
- This role will be bound to the ServiceAccount used by the 'my-app' Deployment.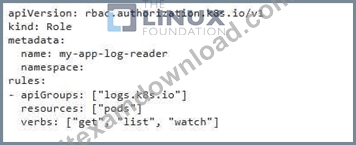
2. Create a RoleBinding: - Create a RoleBinding named 'my-app-log-reader-binding' to link the 'my-app-log-reader' Role to the 'my-app-sa' ServiceAccount. - This binding allows the 'my-app-sa' to use the permissions defined in the 'my-app-log-reader' role.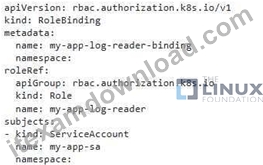
3. Apply the Configurations: - Apply the Role and RoleBinding YAML files to your Kubernetes cluster using 'kubectl apply -f role.yamr and 'kubectl apply -f rolebinding_yamr 4. verify the RBAC: - Once applied, you can verify the RBAC configuration by using 'kubectl auth can-i get pods --as=my-app-sa --namespace=' - This command should show 'yes' indicating that the ServiceAccount can access pods. - You can also check for access to logs with a similar command: 'kubectl auth can-i get pods/my-app-pod-name --namespace=' - Replace "my-app-pod-name' with the actual pod name of the application. 5. Test Access: - Try accessing the logs using "kubectl logs my-app-pod-name -n ' while impersonating the ServiceAccount 'my-app-sa' - You should be able to view the logs successfully. If any user tries to access the logs without the necessary permissions, they will be denied. Important Note: This is a basic example and can be further Kustomize d depending on your specific security needs. You can adjust the 'rules' in the Role definition to control specific permissions for users or ServiceAccounts. For example, you might restrict access to certain namespaces or resources. ]
NEW QUESTION # 37
Exhibit: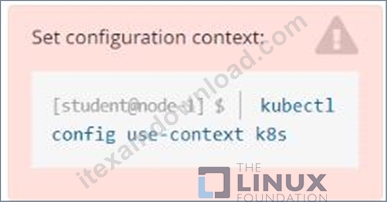
Given a container that writes a log file in format A and a container that converts log files from format A to format B, create a deployment that runs both containers such that the log files from the first container are converted by the second container, emitting logs in format B.
Task:
* Create a deployment named deployment-xyz in the default namespace, that:
* Includes a primary
lfccncf/busybox:1 container, named logger-dev
* includes a sidecar Ifccncf/fluentd:v0.12 container, named adapter-zen
* Mounts a shared volume /tmp/log on both containers, which does not persist when the pod is deleted
* Instructs the logger-dev
container to run the command
which should output logs to /tmp/log/input.log in plain text format, with example values: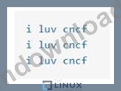
* The adapter-zen sidecar container should read /tmp/log/input.log and output the data to /tmp/log/output.* in Fluentd JSON format. Note that no knowledge of Fluentd is required to complete this task: all you will need to achieve this is to create the ConfigMap from the spec file provided at /opt/KDMC00102/fluentd-configma p.yaml , and mount that ConfigMap to /fluentd/etc in the adapter-zen sidecar container
- A. Solution:

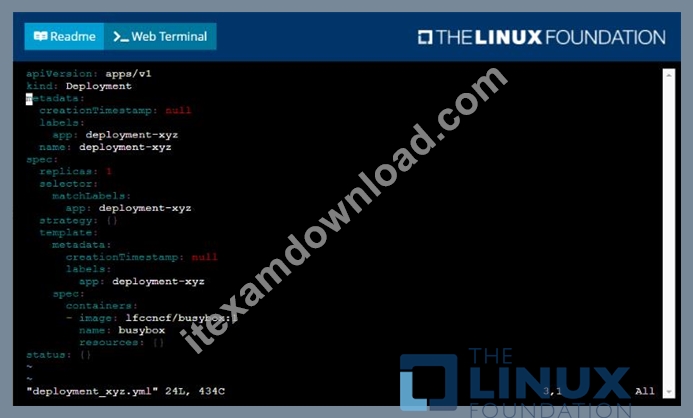
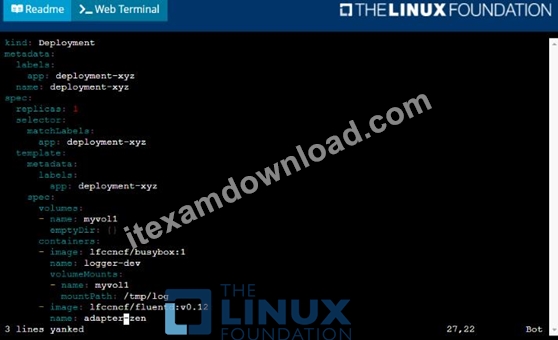
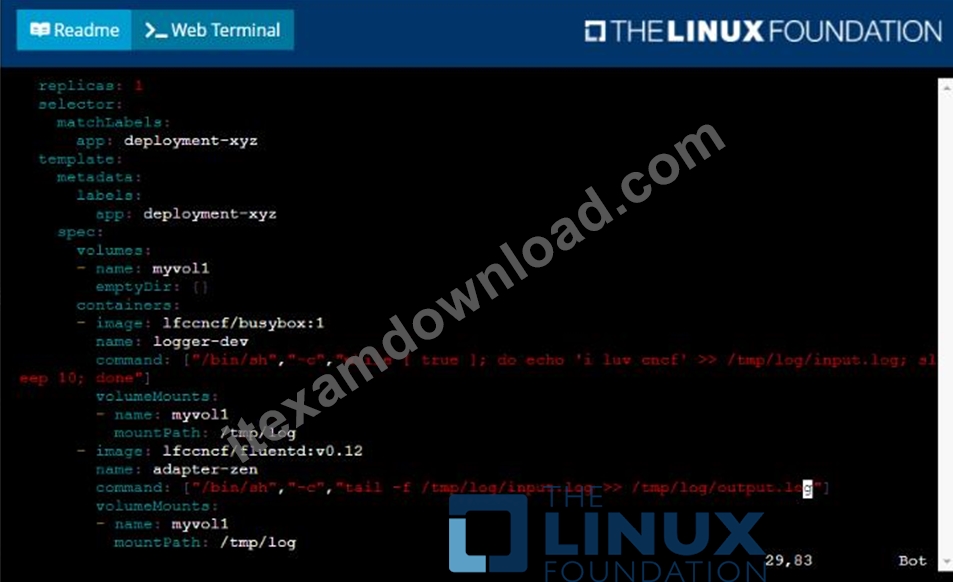
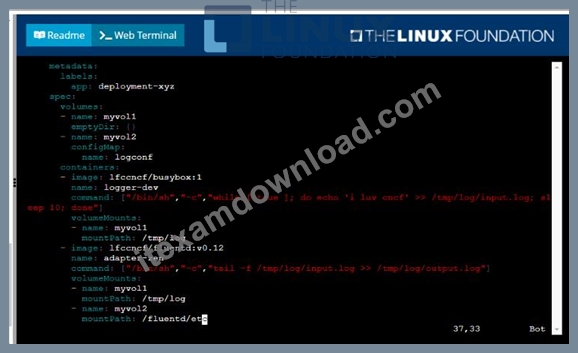
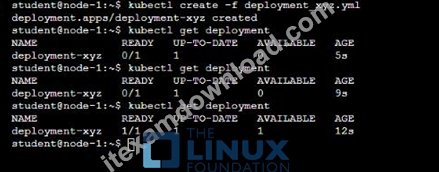
- B. Solution:
Answer: A
NEW QUESTION # 38
You have a Kustomization file that defines a Deployment with two replicas. You want to configure the deployment to use a different image tag based on the environment it is deployed to- For example, in the 'dev' environment, the image tag should be 'example/nginx:dev' , while in the 'prod' environment, it should be 'example:nginx:prod'. Describe how to achieve this using Kustomize.
Answer:
Explanation:
See the solution below with Step by Step Explanation.
Explanation:
Solution (Step by Step) :
1. Create a base Kustomization file:
resources :
- deployment. yaml
2. Create a deployment-yaml file: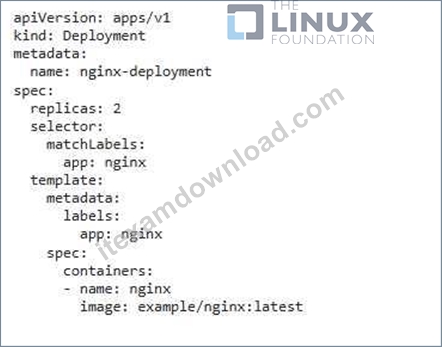
3. Create environment-specific overlays: - For dev environment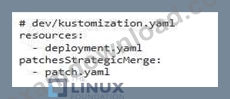
- For prod environment: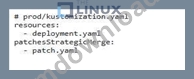
4. Create a patch.yaml file: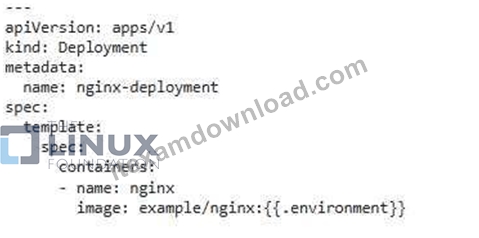
5. Apply Kustomize: - For dev environment: bash Kustomize dev I oubect1 apply -f - - For prod environment: bash Kustomize prod I oubect1 apply -f - - The base customization file defines the resources that are included in the deployment. - The environment-specific overlays patch the base resources With the appropriate image tag. - The patchesStrategicMerge' field applies the patch.yaml tile to the deployment. - The '{{.environment}Y placeholder in the patch file is replaced with the actual environment name when Kustomize is applied. This approach allows you to easily manage and deploy your applications to different environments with specific configuration settings.
NEW QUESTION # 39
You have a ConfigMap named 'database-config' tnat stores sensitive information for connecting to a database. You want to ensure that this ConfigMap is only accessible by a specific namespace and not by other namespaces in the cluster.
Answer:
Explanation:
See the solution below with Step by Step Explanation.
Explanation:
Solution (Step by Step) :
1. Create a Namespace:
bash
kubectl create namespace my-database-namespace
2. Move the ConfigMap to the Namespace:
bash
kubectl move configmap database-config -n my-database-namespace
3. Configure Role-Based Access Control (RBAC):
- Create a Role: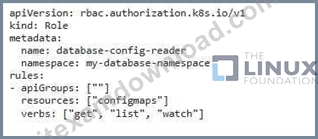
- Create a RoleBinding: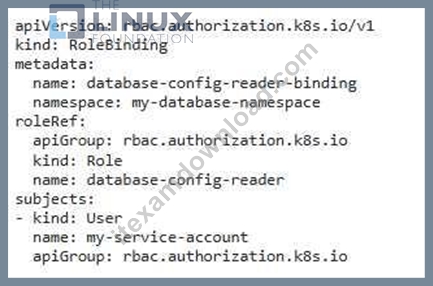
- Replace 'my-service-account with the actual name of the service account that needs access to the ConfigMap. 4. Apply the Role and Role3inding: bash kubectl apply -f database-config-reader.yaml kubectl apply -f database-config-reader-binding.yaml 5. Verify Access: - From the 'my-database-namespace': bash kubectl get configmap database-config -n my-database-namespace The command should succeed as the service account in this namespace has the necessary permissions. - From a different namespace: bash kubectl get configmap database-config -n another-namespace This command should fail as the service account in this namespace does not have access to the ConfigMap. This solution uses RBAC to restrict access to the ConfigMap to only the service account in the 'my-database-namespace'. This ensures that sensitive information is only accessible by authorized entities within the cluster,
NEW QUESTION # 40
You are developing a service that uses a custom configuration file called 'service.properties'. You want to use ConfigMaps to store and manage this file in a secure and efficient manner. The 'service-properties' file contains sensitive information such as database credentials and API keys.
How would you create a ConfigMap that securely stores the 'service-properties' file, ensuring that the file is accessible only to the service's container?
Answer:
Explanation:
See the solution below with Step by Step Explanation.
Explanation:
Solution (Step by Step) :
1. Create a Secret for Sensitive Data:
- Create a Secret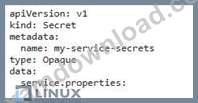
- Encode the 'service-properties' file: bash echo "your-database-username=your-database-username" > service-properties echo "your-database-password=your-database-password" >> service-properties echo 'Your-api-key=your-api-key" >> service.properties base64 -w 0 service.properties - Replace with the output from the base64 command. 2. Create the ConfigMap for the File: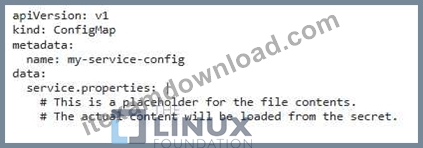
3. Apply the Secret and ConfigMap: bash kubectl apply -f service-secrets-yaml kubectl apply -f service-config.yaml 4. Update the Deployment to use the ConfigMap and Secret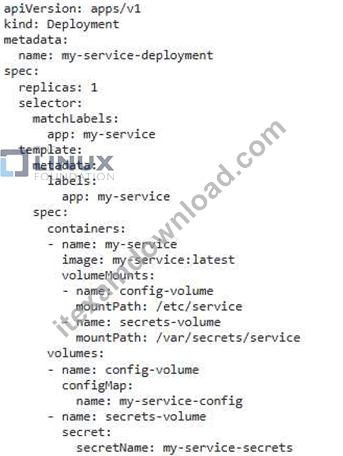
5. Apply the updated Deployment: bash kubectl apply -f my-service-deployment-yaml 6. Access the File in the Container. - Mount the ConfigMap and Secret: - The ConfigMap mounts the 'service.properties' file as a placeholder. - The Secret mounts the actual 'service.properties' file securely. - Access the File: - The container should access the 'service.properties' file from '/var/secrets/service/service.properties' This approach uses a Secret to store sensitive data and a ConfigMap to mount the file securely within the container. The container will have access to the 'service-properties' file, but the actual data is stored in the Secret, ensuring its confidentiality'.
NEW QUESTION # 41 
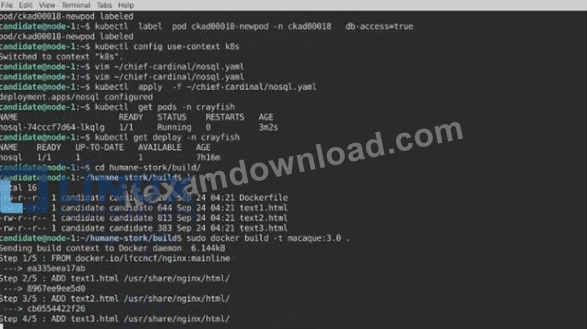
Task:
A Dockerfile has been prepared at -/human-stork/build/Dockerfile
1) Using the prepared Dockerfile, build a container image with the name macque and lag 3.0. You may install and use the tool of your choice.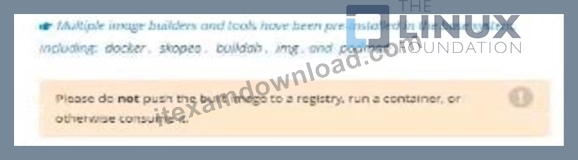
2) Using the tool of your choice export the built container image in OC-format and store it at -/human stork/macque 3.0 tar See the solution below.
Answer:
Explanation:
Explanation
Solution: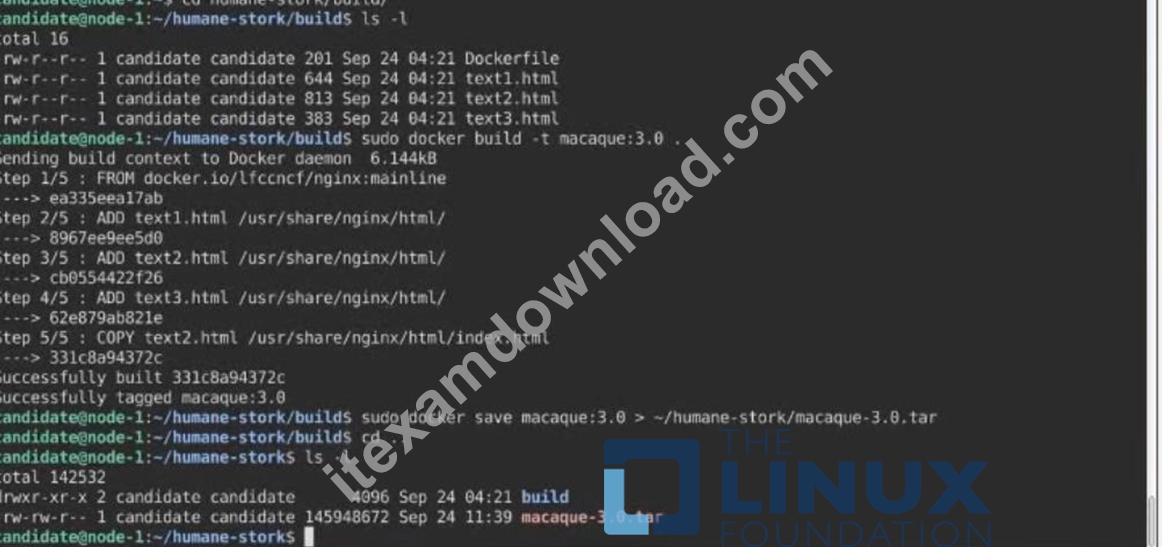
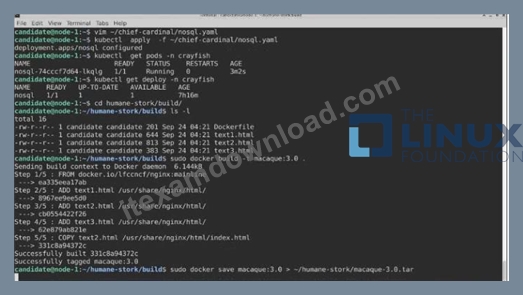
NEW QUESTION # 42 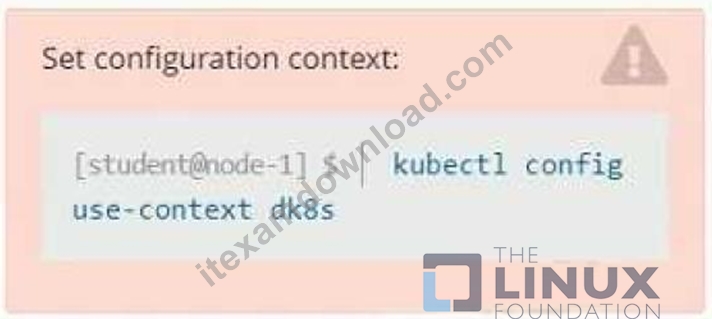
Context
A user has reported an aopticauon is unteachable due to a failing livenessProbe .
Task
Perform the following tasks:
* Find the broken pod and store its name and namespace to /opt/KDOB00401/broken.txt in the format:
The output file has already been created
* Store the associated error events to a file /opt/KDOB00401/error.txt, The output file has already been created. You will need to use the -o wide output specifier with your command
* Fix the issue.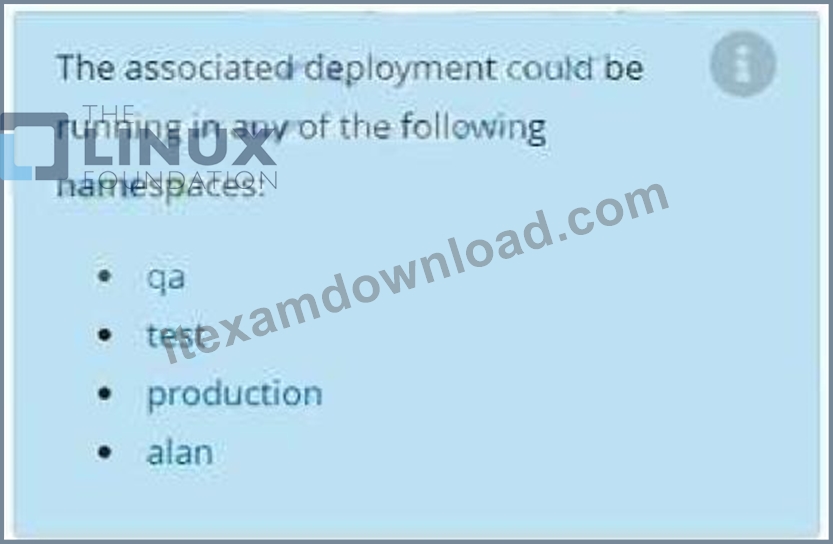
Answer:
Explanation:
See the solution below.
Explanation
Solution:
Create the Pod:
kubectl create
-f http://k8s.io/docs/tasks/configure-pod-container/
exec-liveness.yaml
Within 30 seconds, view the Pod events:
kubectl describe pod liveness-exec
The output indicates that no liveness probes have failed yet:
FirstSeen LastSeen Count From SubobjectPath Type Reason Message
--------- -------- ----- ---- ------------- -------- ------ -------
24s 24s 1 {default-scheduler } Normal Scheduled Successfully assigned liveness-exec to worker0
23s 23s 1 {kubelet worker0} spec.containers{liveness} Normal Pulling pulling image
"gcr.io/google_containers/busybox"
23s 23s 1 {kubelet worker0} spec.containers{liveness} Normal Pulled Successfully pulled image
"gcr.io/google_containers/busybox"
23s 23s 1 {kubelet worker0} spec.containers{liveness} Normal Created Created container with docker id
86849c15382e; Security:[seccomp=unconfined]
23s 23s 1 {kubelet worker0} spec.containers{liveness} Normal Started Started container with docker id
86849c15382e
After 35 seconds, view the Pod events again:
kubectl describe pod liveness-exec
At the bottom of the output, there are messages indicating that the liveness probes have failed, and the containers have been killed and recreated.
FirstSeen LastSeen Count From SubobjectPath Type Reason Message
--------- -------- ----- ---- -------------
37s 37s 1 {default-scheduler } Normal Scheduled Successfully assigned liveness-exec to worker0
36s 36s 1 {kubelet worker0} spec.containers{liveness} Normal Pulling pulling image
"gcr.io/google_containers/busybox"
36s 36s 1 {kubelet worker0} spec.containers{liveness} Normal Pulled Successfully pulled image
"gcr.io/google_containers/busybox"
36s 36s 1 {kubelet worker0} spec.containers{liveness} Normal Created Created container with docker id
86849c15382e; Security:[seccomp=unconfined]
36s 36s 1 {kubelet worker0} spec.containers{liveness} Normal Started Started container with docker id
86849c15382e
2s 2s 1 {kubelet worker0} spec.containers{liveness} Warning Unhealthy Liveness probe failed: cat: can't open
'/tmp/healthy': No such file or directory
Wait another 30 seconds, and verify that the Container has been restarted:
kubectl get pod liveness-exec
The output shows that RESTARTS has been incremented:
NAME READY STATUS RESTARTS AGE
liveness-exec 1/1 Running 1 m
NEW QUESTION # 43 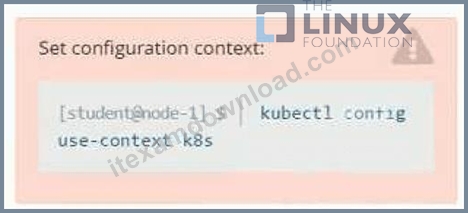
Context
You are tasked to create a secret and consume the secret in a pod using environment variables as follow:
Task
* Create a secret named another-secret with a key/value pair; key1/value4
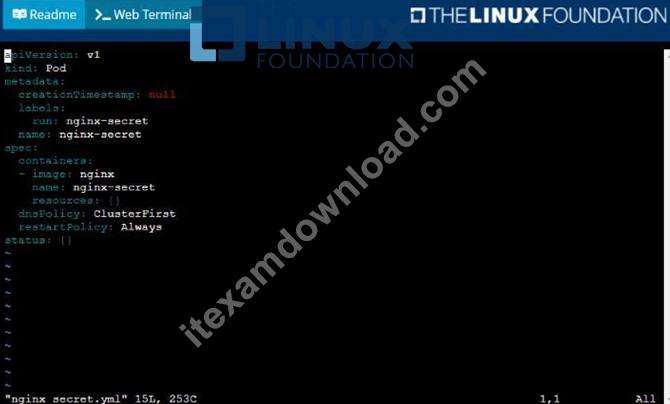
* Start an nginx pod named nginx-secret using container image nginx, and add an environment variable exposing the value of the secret key key 1, using COOL_VARIABLE as the name for the environment variable inside the pod See the solution below.
Answer:
Explanation:
Solution: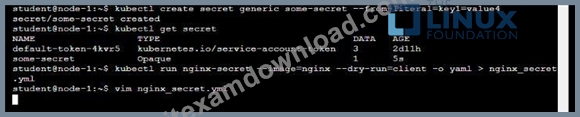

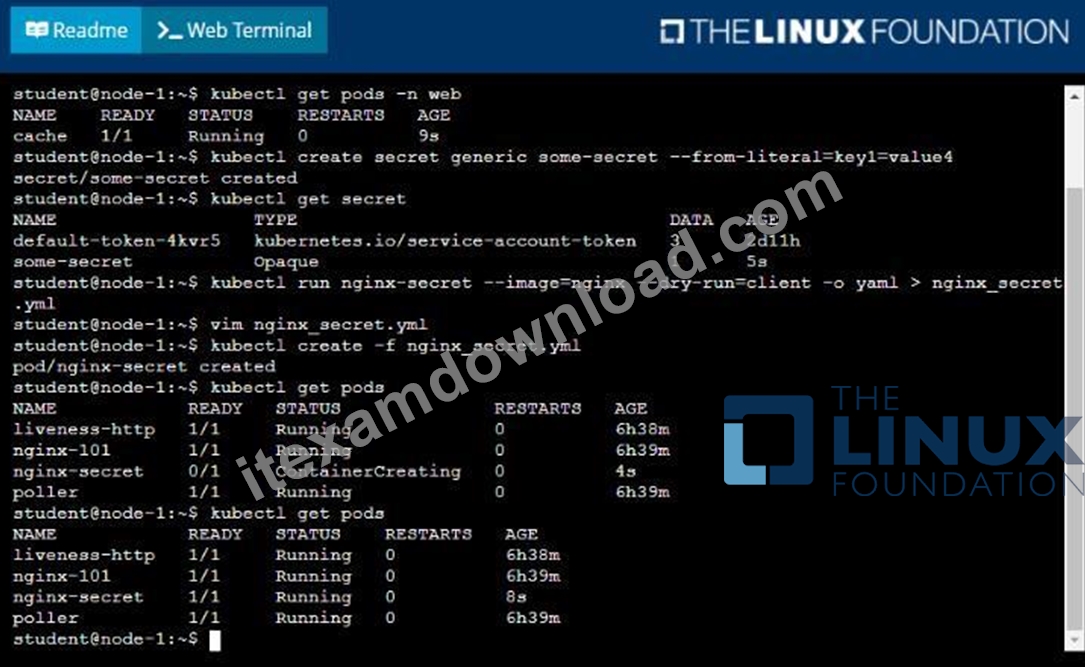
NEW QUESTION # 44
Context
An existing web application must be exposed externally.
You must connect to the correct host . Failure to do so may result in a zero score.
[candidate@base] $ ssh ckad00025
An application externally using the URL external.sterling-bengal.local . Any requests starting with / must be routed to the application web-app.
To test the web application's external reachability, run
[candidate@ckad00025]
$ curl http://external.sterling-bengal.local/
or open this URL in the remote desktop's browser.
Answer:
Explanation:
See the Explanation below for complete solution.
Explanation:
ssh ckad00025
You need to expose the existing app "web-app" externally at:
* Host: external.sterling-bengal.local
* Path: / (and anything starting with /) # route to web-app
In CKAD labs, this is almost always done with an Ingress pointing to the Service web-app.
1) Find where web-app Service lives (namespace + port)
kubectl get svc -A | grep -w web-app
You'll get something like:
<NAMESPACE> web-app ClusterIP ... <PORT>/TCP
Set the namespace:
NS=<NAMESPACE>
Check the service port(s):
kubectl -n $NS get svc web-app -o yaml
Note the service port number (commonly 80).
Also verify it has endpoints (so it actually routes to pods):
kubectl -n $NS get endpoints web-app -o wide
If endpoints are empty, the Service selector doesn't match pods - tell me and I'll give the exact fix. But usually it's fine.
2) Create the Ingress to route / to web-app
Create a manifest (use the service port you saw; I'll assume 80 below):
cat <<'EOF' > web-app-ingress.yaml
apiVersion: networking.k8s.io/v1
kind: Ingress
metadata:
name: web-app-ingress
spec:
rules:
- host: external.sterling-bengal.local
http:
paths:
- path: /
pathType: Prefix
backend:
service:
name: web-app
port:
number: 80
EOF
Apply it:
kubectl -n $NS apply -f web-app-ingress.yaml
Verify:
kubectl -n $NS get ingress web-app-ingress
kubectl -n $NS describe ingress web-app-ingress
If your Service port is not 80, change number: 80 to the correct value and re-apply.
3) Test external reachability (as instructed)
Run exactly:
curl
-i http://external.sterling-bengal.local/
If curl still fails (quick checks)
A) Is there an ingress controller running?
kubectl get pods -A | egrep -i 'ingress|nginx'
kubectl get svc -A | egrep -i 'ingress|nginx'
B) Does Ingress show an address?
kubectl -n $NS get ingress web-app-ingress -o wide
C) Do we have endpoints?
kubectl -n $NS get endpoints web-app -o wide
NEW QUESTION # 45
You are developing a new microservice that requires access to a database deployed in a different namespace. You want to configure a ServiceAccount and RoleBinding to provide the necessary permissions for the microservice to connect to the database.
Answer:
Explanation:
See the solution below with Step by Step Explanation.
Explanation:
Solution (Step by Step) :
1. Create a ServiceAccount:
- Create a ServiceAccount in the namespace where our microservice is deployed: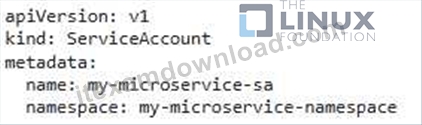
2. Create a Role: - Create a Role in the namespace where the database is deployed, granting access to the database resources: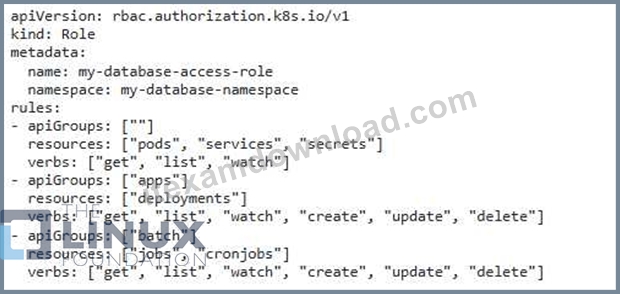
3. Create a ROIeBinding: - Create a RoleBinding in the database namespace to bind the Role to the ServiceAccount: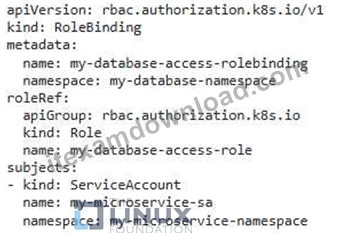
4. Apply the Configuration: - Apply the created ServiceAccount, Role, and Roledinding using 'kubectl apply -r commands: bash kubectl apply -f my-microservice-sa_yaml kubectl apply -f my-database-access-role-yaml kubectl apply -f my-database-access-rolebinding.yaml 5. Configure the Microservice: - Mount the ServiceAccount token as a secret within the microservice's pod: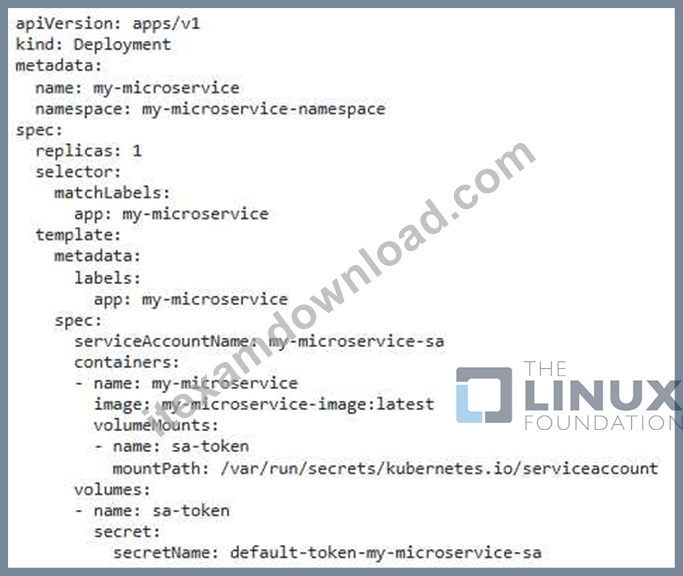
6. Verify Permissions: - Access the database from the microservice pod to verify that the required permissions are granted.
NEW QUESTION # 46
You are deploying a new application named 'cnat-app' that requires 5 replicas. You want to implement a rolling update strategy that ensures only one pod is unavailable at any given time, while also allowing for the creation of two new pods simultaneously. This will help to ensure that the application remains available during the update process.
Answer:
Explanation:
See the solution below with Step by Step Explanation.
Explanation:
Solution (Step by Step) :
1. Update the Deployment YAML.
- Update the 'replicas' to 5.
- Define 'maxunavailable: and 'maxSurge: 2' in the 'strategy.roIIingUpdate' section.
- Configure a 'strategy-type' to 'Rollingupdate' to trigger a rolling update when the deployment is updated.
- Add a 'spec-template-spec-imagePullPolicy: Always' to ensure that the new image is pulled even if it exists in the pod's local cache.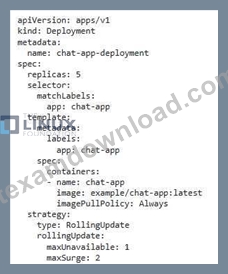
2. Create the Deployment: - Apply the updated YAML file using 'kubectl apply -f chat-app-deployment.yamr 3. Verify the Deployment: - Check the status of the deployment using 'kubectl get deployments chat-app-deployment to confirm the rollout and updated replica count. 4. Trigger the Automatic Update: - Push a new image to the 'example/chat-app:latest' Docker Hub repository. 5. Monitor the Deployment - Use ' kubectl get pods -l app=chat-app' to monitor the pod updates during the rolling update process. You will observe that one pod is terminated at a time, while two new pods with the updated image are created- 6. Check for Successful Update: - Once the deployment is complete, use 'kubectl describe deployment chat-app-deployment to see that the 'updatedReplicas' field matches the 'replicas' field, indicating a successful update.
NEW QUESTION # 47
......
Get CKAD Braindumps & CKAD Real Exam Questions: https://www.itexamdownload.com/CKAD-valid-questions.html
Linux Foundation CKAD Actual Questions and Braindumps: https://drive.google.com/open?id=1Mh-CZwkcjNSQkknSnLygonlUbkH2z6PB